Projects / NMEA 0183 to WiFi Bridge
NMEA 0183 to WiFi Bridge
A straightforward beginner DIY project — just five wires soldered between three small boards (nine including the external power and NMEA connections). The parts cost a few pounds and are all available online. Once built, it connects your existing NMEA 0183 instruments to your boat's WiFi so your phone or tablet can display GPS position, AIS targets, depth, wind, and speed — in real time, on Navionics or any other chart app.
What it does
Most boats already have instruments that output position, speed, heading, depth, wind, and AIS data — but only over a wired serial connection that your phone or tablet can't access. This device reads that data and puts it on your WiFi network.
Open Navionics, iNavX, or OpenCPN on a phone or tablet connected to the boat WiFi and you will see your GPS track, AIS targets of nearby vessels, and live instrument readings. Multiple devices can all receive the data at the same time.
A commercial WiFi multiplexer (such as the Vesper Cortex or Yacht Devices YDWG-02) costs £150–£300. This build does the same job for a few pounds.
If your boat already has an NMEA 2000 network, this project is still fully compatible. Third-party NMEA 2000 WiFi gateways read the CAN bus and transmit standard NMEA 0183 sentences onto your boat WiFi — the same format this bridge uses. The two simply coexist on the same network. This means you can use the bridge to connect an older NMEA 0183 instrument that isn't on the NMEA 2000 bus — a legacy GPS, an older depth sounder, or a VHF with DSC output — and its data will appear alongside your NMEA 2000 data in any chart app.
Key features
- ▸GPS position on Navionics on iPad, iPhone, or Android, iNavX, OpenCPN, or any NMEA-compatible app
- ▸Gives full GPS functionality to tablets and laptops with no built-in GPS — your boat's instruments become the position source
- ▸AIS targets — see other vessels on the chart in real time
- ▸Depth, wind, speed, and heading from your instruments
- ▸Multiple phones, tablets, and laptops all receive data simultaneously
- ▸Multiple instruments can be multiplexed — run additional bridges in client mode, each feeding a different instrument output into the same WiFi network
- ▸One bridge acting as the vessel WiFi hotspot can serve up to 4 simultaneous clients — a mix of other bridges, chart plotters, iPads, phones, or laptops all sharing the same NMEA data stream
- ▸Browser-based setup — no app to install, configure from any device
- ▸Creates its own WiFi hotspot if no vessel network is available
- ▸Configurable baud rate — default 38400, but older instruments (e.g. some GPS units) may use 4800
- ▸UDP broadcast and TCP server — compatible with all major chart apps
- ▸Reset to factory defaults via the boot button
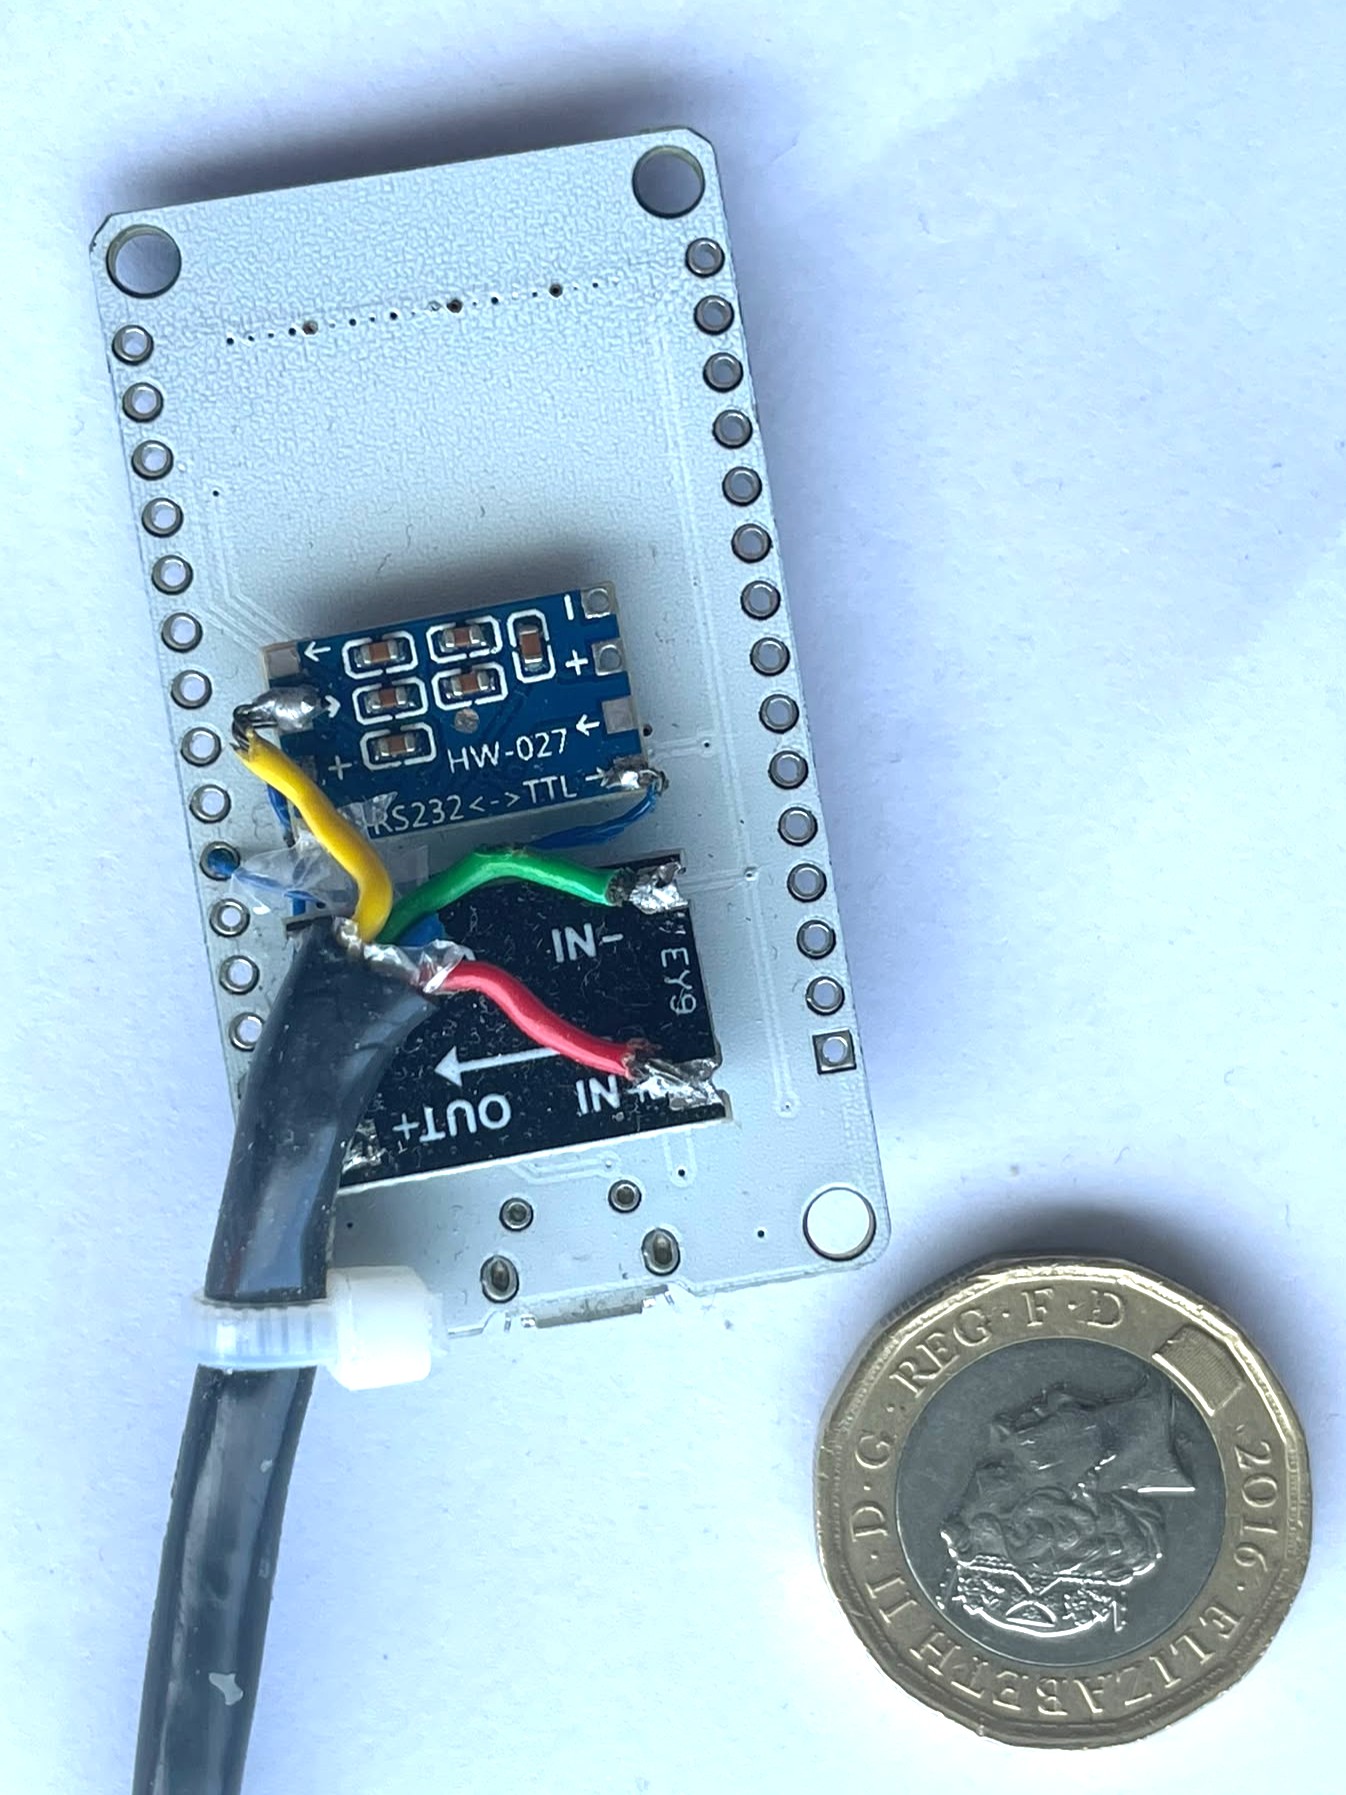
A completed unit. The DC-DC converter (top) and HW-027 RS-232 adapter (middle, blue) are superglued to the back of the ESP32 board. The NMEA cable enters via a cable tie used as a strain relief.
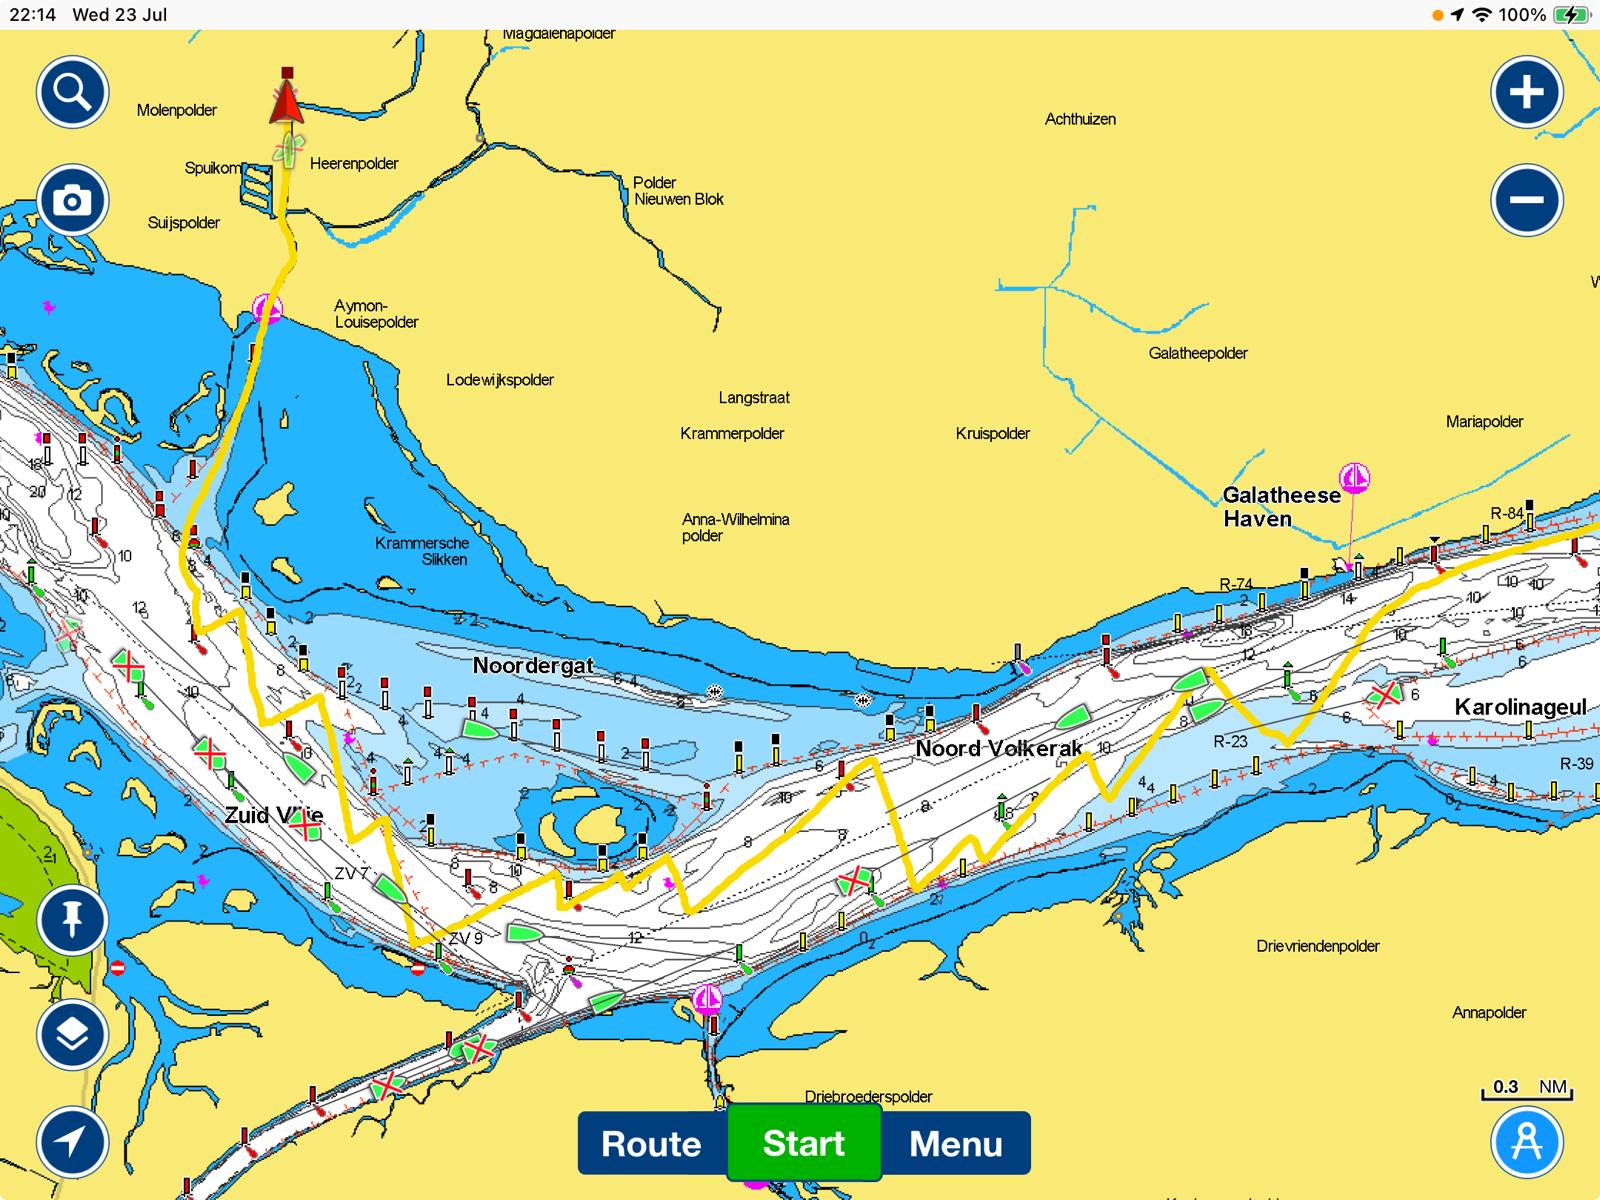
Navionics on an iPad receiving live position and AIS targets via the bridge.
What you need
All parts are available from AliExpress for a few pounds each — total cost is typically under £15. Amazon and eBay stock the same items at slightly higher prices if you need faster delivery.
Parts
- ESP32-WROOM-32 development boardSearch "ESP32 38-pin development board" on AliExpress, Amazon or eBay. Available with either a micro-USB or USB-C connector — either works, choose whichever you prefer. Around £4–6.
- HW-027 RS-232 to TTL adapterThe blue board with a MAX3232 chip. Search "HW-027 RS232 TTL" or "MAX3232 module". Around £2.
- 8–30V to 3.3V DC-DC step-down converterSearch "DC-DC step-down 3.3V module". Covers the full yacht supply range — from flat batteries (~10V) to charging voltage (~14.4V) and up to 17V during alternator charging. Around £2.
- Short lengths of wireFour colours recommended: red, black, and two others for the NMEA signal wires.
- 200 mA fuse and inline fuse holderFit in the positive supply wire close to the supply source. Protects against wiring faults. A standard blade or glass fuse holder works fine — search "inline blade fuse holder" or "inline glass fuse holder".
Tools
- ·Soldering iron and solder (for the wiring connections)
- ·A Windows, Mac, or Linux computer with Chrome or Edge (for the first firmware install)
- ·A USB cable to match your board — micro-USB or USB-C depending on which variant you bought
Wiring
Connect the RS-422 adapter output to the ESP32. The firmware uses GPIO 16 (RX) and GPIO 17 (TX) by default.
| RS-422 adapter | ESP32 pin |
|---|---|
| TXD (data out) | GPIO 16 (RX2) |
| RXD (data in) | GPIO 17 (TX2) |
| GND | GND |
| VCC | 3.3V |
Powering the unit
For permanent installation, take the supply feed for the DC-DC converter from the same supply rail that powers your NMEA 0183 source instrument (GPS, AIS receiver, etc.), using short leads. The converter accepts 8–30 V, covering the full range of a yacht electrical system — from flat batteries (~10 V) through normal running (12–13 V) to alternator charging voltage (up to 17 V). The unit draws well under half a watt. When both devices share the same supply and are connected by short wires, the NMEA signal lines are at the same ground reference and no opto-isolator is required. Fit a 200 mA inline fuse on the positive feed close to the supply.
The DC-DC converter outputs 3.3 V. Connect its positive output to the 3V3 pin and its negative to any GND pin. Do not connect both a USB cable and an external 3.3 V supply at the same time — power the board one way or the other.
| Power supply | ESP32 pin |
|---|---|
| + 3.3 V | 3V3 |
| GND | GND |

Configuration
On first boot, or if no vessel network is found, the device creates its own WiFi access point. Connect to it and open 192.168.4.1 in a browser to configure your vessel network. When connected to your vessel WiFi, the device is available at nmea.lan or its assigned IP.
Default AP credentials
SSID: NMEA_Bridge
Password: Epoxy123
Config page: http://192.168.4.1
| Setting | Default | Notes |
|---|---|---|
| UDP broadcast | Enabled | Port 2000 |
| TCP server | Disabled | Port 10110 — enable if your chart app requires TCP |
| Baud rate | 38400 | Most instruments use 38400. Older GPS units may use 4800 — check your instrument manual |
| OTA updates | Disabled | Enable only if you plan to update firmware over WiFi |
| Checksum validation | Disabled | Blue LED flashes on error when enabled |
| Local DNS name | nmea | Resolves as nmea.lan |
What the configuration page looks like
Tritium NMEA Bridge
Install firmware
Flash directly from your browser
Connect your ESP32 to this computer via USB, then click Install. Works in Chrome and Edge on Windows, Mac, and Linux. No software to install.
After flashing, the device will create a WiFi access point. Connect to NMEA_Bridge using password Epoxy123, then open http://192.168.4.1 to configure your vessel network.
The firmware source code is not published. The build guides are written to be self-contained — if something is unclear, re-read the wiring section carefully before assuming a fault.
Important notices
Not for sole reliance in navigation
This device must not be used as the sole source of navigation data. Always cross-check position, AIS, and instrument data against independent sources. Electronic systems can fail without warning. The skipper is at all times responsible for the safe navigation of the vessel.
Static precautions
The circuit board contains components that can be permanently damaged by electrostatic discharge (ESD). Handle boards by their edges, avoid touching component pins, and work on an anti-static mat or touch a grounded metal surface before handling to discharge any static build-up.
No warranty
This project is provided free of charge and without warranty of any kind. Use entirely at your own risk.
Find it useful?
Support this project
This project is free to use. If it saved you the cost of a commercial WiFi multiplexer, a small voluntary contribution helps fund future projects.
Support TritiumThird-party open-source components used in this project are listed on the licences page.
2